 Audio option for listening:
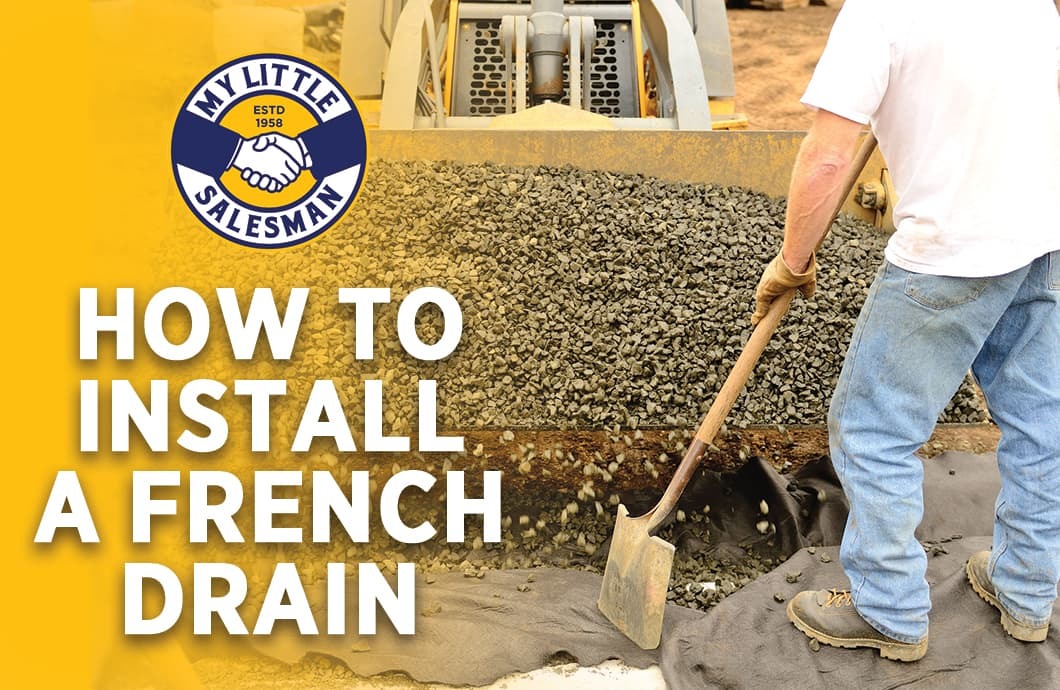
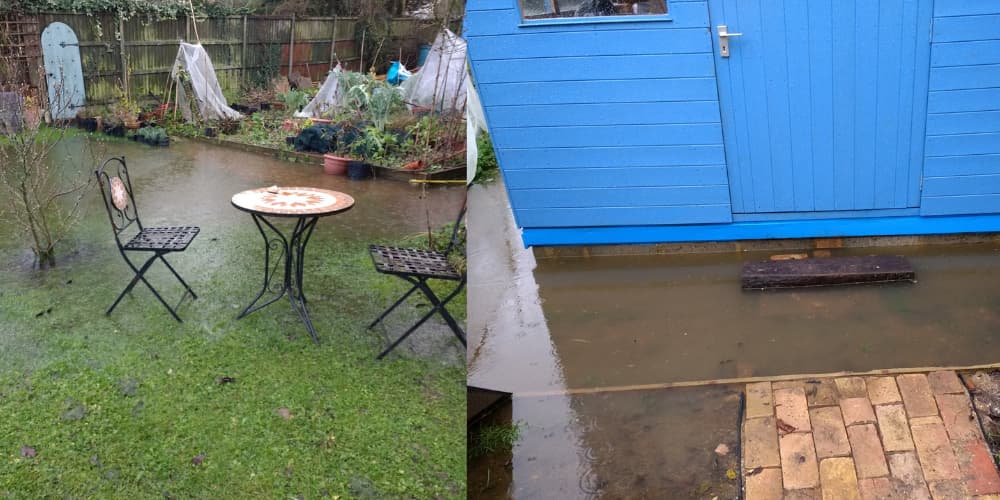 Look familiar? If so, yikes! Ah, we mean—it looks like you could use a French drain.
Whether your yard’s slope is playing prison warden to rainwater after a downpour or you’re finding water seeping into your crawl space or basement, it’s time to take action. Well, technically speaking, the time to take action was waaay before the last rain—but the next best time is NOW!
To keep water away from your home, business, or anywhere you’d prefer to keep dry, you’ll need to install some form of a drainage system. To avoid having to continually maintain a pump-driven drainage system, why not install a system that uses gravity to carry water away from your home or business?
Many styles of gravity-fed yard drainage systems exist (catch basins, channel drains, creek beds, dry wells, etc.). In this guide, we will be showing you how to install a French drain.
“Nice! But wait a minute…”
A French drain is a length perforated pipe or pipes buried within a gravel-lined trench dug in a yard that captures water and uses gravity to whisk it off to “daylight” (“daylight” being what we will call an external reservoir beyond your property line—NOT your neighbor’s yard. Nice try, though).
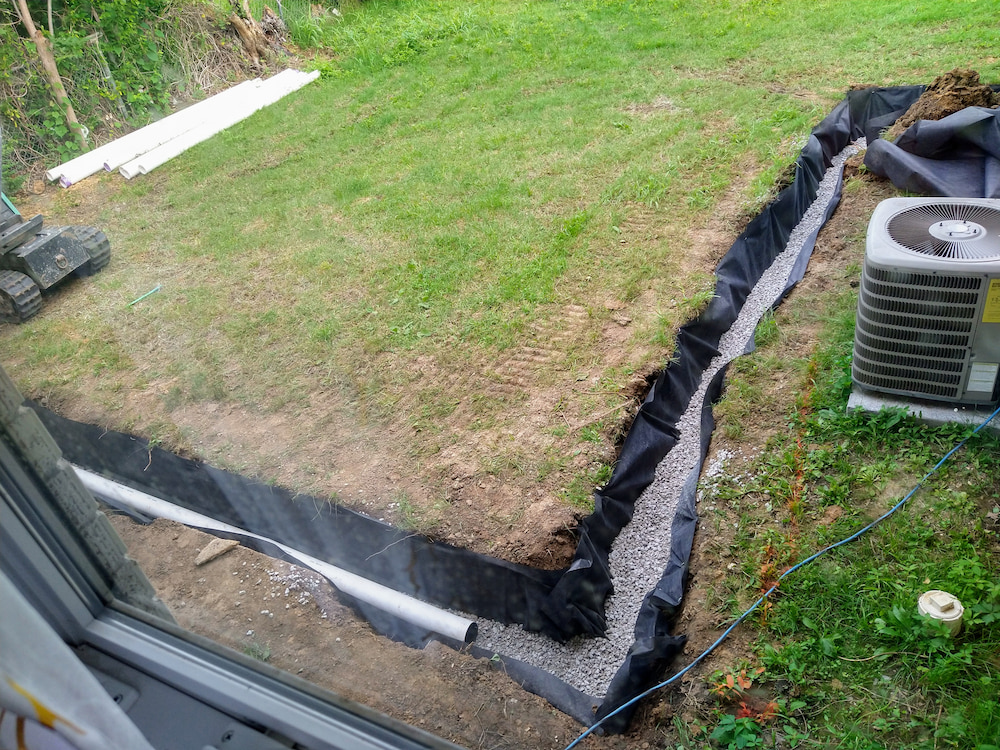
Here is a French drain mid-installation.
In most modern French drain systems, a water-permeable landscaping fabric may also be used to create a barrier to keep soil from clogging up the spaces between the gravel and pipe perforations (fancy term for “holes”). Some French drains are covered with sod while others are left with an open gravel top to allow for maximum water flow into the system—something we’ll outline later in this guide.
“I’m sold! But I was wondering…”
You ever heard of a little something called “magic”? Well, these just use physics.
French drains work by intercepting water along a low-lying perimeter as it flows down a yard slope before it can cause damage. This interception occurs by creating an alternate downward slope within the French drain’s pipe to reroute the water’s path of flow—a water offramp, if you will.
As the water continually follows gravity to the lowest possible spot, it approaches the French drain, it flows through the permeable fabric, between the gravel, and into the holes (sorry, [clears throat] “perforations”) made in the buried drainpipe.
Because the drain pipe was buried within the gravel at a slight angle, creating “fall” in a specific direction, the water follows the inside of the pipe to your preferred outlet instead in staying your yard or heading toward your basement.
Yes! With the right planning, preparation, tools, and supplies, the average able-bodied home or property owner should be able to design and install a French drain without professional assistance.
While this is true, failure to take a number of factors into account may result in a faulty French drain. There are a handful of scenarios in which French drain installation can even be dangerous, but we will also cover these in this tutorial.
The pipe-aspect of French drain pipes are typically made of flexible black corrugated pipe or white PVC with slits or holes to allow water to flow into them. There are many pros and cons of using either corrugated or hard PVC for your French drain system.
You will need to decide whether or not you want to install a corrugated pipe or solid PVC pipe.

- Corrugated drain pipe is relatively inexpensive—coming in 100-foot rolls that, at the time of the publication of this guide, cost anywhere from $90-$300, depending on the features and thicknesses. It’s fairly easy to install because it bends in most directions. With this being said, a corrugated pipe may collapse under greater weights, so it is discouraged for use under driveways, sidewalks, and the like. It also has a ribbed bore (not a smooth inside) that may catch debris such as roof shingle gravel, leaves, dirt, and the like.
- Another choice is solid PVC drain pipe—usually, schedule 35 thickness (schedule 40 to 80 are typical for residential plumbing). PVC drain pipe is incredibly strong, making it the choice for installing under heavier surfaces. PVC also has a smooth bore—allowing for easier flow that washes out most debris. With this being said, PVC pipes can cost twice as much as corrugated pipe (or more!) and require a certain level of skill to install—as it does not bend.
Before you can start digging, you need to determine where your French drain will need to go.
If you’re not sure precisely where your French drain should go, follow these steps.
- Keep a camera or a notepad handy the next time it rains.
- Shortly after the rain lets up, don your boots and go outside to see where the water is settling or pooling. These will be the lowest spots in the yard where the rainwater has nowhere else to go or where you’d prefer the water not to go (structure foundation, crawlspace, basement—and the like).
- Document these locations as well as the even lower spot where you would like the water to flow—such as a street gutter, storm sewer, creek, or some other reservoir. Photograph and sketch out where these low-lying areas are using a simple hand-drawn schematic.
- You will likely want to install your French drain system between the structures you wish to protect and the beginning of a positive slope (sloping away) from said structure.
- Measure the length of these low spots as well as the distance between the edge of low spots and the length of travel from there to your “daylight” outlet.
Only the lowest areas where the terrain contains no naturally angled “fall” will need to contain the water-catching sections of your French drain system. There will also be sections of your French drain system that won’t need to catch water—but rather simply deliver it from the water-catching gravel sections to your “daylight” location. When measuring locations, account for the sections that will be dedicated to capturing flowing groundwater through the fabric, gravel, and perforated pipe and those that only need to continue to carry captured water to daylight.
It is essential that all sections of your entire system have adequate “fall” in order to carry water to an outlet to daylight. But we’ll get to that once we discuss French drain installation.
If you’re also needing to manage the water that runs out of your roof’s downspouts, you should either plan to:
- Run the downspouts directly into their own buried drain pipes with enough “fall” to take them to “daylight” (the preferred option)
- Link the downspouts directly into your buried French drain system with an underground connector
- Install catch basins at the base of the outlet of the downspouts that feed into your French drain system or to their own buried solid pipe to daylight
Failure to account for downspouts will result in a less efficient French drain system—as it will not only have to account for drainage in the yard but also need to catch water as it comes out of the downspouts through the gravel. This may overwhelm your French drain system and lead to additional pooling.
“Ok, I have determined the length of the French drain and a solid outlet drain. Now…”
- Enough ½ - ¾ inch washed gravel (preferably river gravel or granite) to completely bury the water-capturing perforated drain pipe sections in your trenches—which will be likely anywhere from 8 inches to 24 inches deep depending on the section of the drain
- Section(s) of solid (non-perforated) drain pipe for an outlet to daylight
- Origin point cap for the first section of the perforated pipe OR a catch basin with one side closed
- 4-inch black perforated corrugated pipe OR 4-inch Schedule 35 white PVC (pros and cons of each will be discussed later)
- Connectors (and bonding agents for PVC) for the pipe where needed (this will vary depending on pipe style)
- Water-permeable non-woven geotextile landscaping fabric (enough to encapsulate [or “burrito-fy”] the gravel trench contents)
- Fabric stakes or “landscaping staples” driven in with a mallet
- Connectors for downspouts or catch basins + connectors to tie into the system or buried outlet pipes to daylight
- A bag or two of concrete (repatching any cut curb for outlet access to street drainage)
- Optional: several sheets of plywood (for dirt pile and/or sod management)
- A mini-excavator or trencher machine (very much worth renting or hiring out to save your back)
- Skid steer loader (recommend renting or hiring out) or hefty wheelbarrow (for gravel and dirt management)
- Tape measure with pen or pencil
- Notepad for plans/measurements
- Concrete saw (if you will end up needing to cut the curb to create an outlet to the street)
- A few sturdy shovels (preferably trenching shovels)
- Rubber mallet (for fabric stakes/staples/pins)
- Line/string level and appropriate line/string
- 1-3 foot wooden stakes (longer scrap 2x2s or rebar works, too)
.jpg)
Depending on the section of the French drain in question, a trench for a French drain needs to be dug anywhere from 8 inches all way down to 2 feet deep.
“Whoa, 2 feet deep?”
Admittedly, 2 feet would be on the deepest end (the daylight end)of an extremely long French drain system on very flat terrain. French drain trench depths are usually somewhere between such figures—likely 18 to 24 inches deep. The reason for this variation in drain depth is to account for the slope of the drain.
With all this being said, no two French drains will be buried at the same depth—not even within the same system. A trench with no slope is usually called a “moat,” but we digress.
A French drain must have at least a 1% slope throughout its entire length to work properly. So, for every 10 feet of pipe, all pipes need to have at least 1 inch of fall from top to bottom toward daylight—preferably more than 1 inch, but that is the minimum.
 A length of PVC French drain ready for installation.
“Um, what?”
So, for example, let’s say you were installing a French drain on relatively flat terrain in a low spot. If the furthest point from the daylight is buried 10 inches deep, 10 feet closer to daylight should be at least 11 inches deep—and so on. This downward slope allows gravity to carry water through the pipes and to your designated daylight outlet. Keep in mind that 1% is the minimum slope and likely should be exceeded.
- Starting with the beginning section of your French drain (furthest from the daylight outlet), drive your stakes into the ground every 10 feet till your reach your daylight outlet
- Using your string level, tie level lines between each stake (starting from the top of the daylight stake and working backward may make things easier)
- Write down the measurement of each line from the ground to the string for each stake
- Determine the height difference between each section’s string on the stakes
Remember that you need at least 1-inch of downward slope per every 10-foot span of your system from beginning to daylight—preferably more. The difference in ground-to-string measurements from stake-to-stake will show you just how much deeper you will need to make the trench as it continues toward daylight. If your terrain naturally slopes down from the beginning point to your daylight outlet and is simply encumbered by water-restricting structures (roots, hills, and the like), there may be very little difference in your trench depth as you dig it. However, if there is little difference from stake to stake, this will impact how deep your trench will need to be dug from the beginning (current lowest point) to daylight (new lowest point).
For additional help, easydigging.com has a very helpful guide to determining French drain slope.
Before you begin digging any section of your trench, it is critical that you utilize your local 811 provider to have all buried utility lines properly marked. A failure to have your lines properly located and marked may result in damaging utility lines with digging equipment as well as putting yourself and others in severe danger.
Before digging your French drain trenches, also make sure that you:
- Are in compliance with all zoning laws
- Are not digging beyond your property line
- Are in full compliance with any rules put in place by your neighborhood’s homeowners association. (You’d hate to catch the wrath of Walter and Agnus down the street!)
Check-in time! Ok, so you have:
- Your French drain layout designed—including determining which sections will be water-collecting (perforated) versus solid buried outlet drains
- Your trench depth differences to build in the necessary slope
- A plan for downspout tie-ins or additional drainage
- Your materials delivered to the installation location
- All of the tools and equipment (including rented machines) ready or reserved
- Your utility lines marked
Now you can…
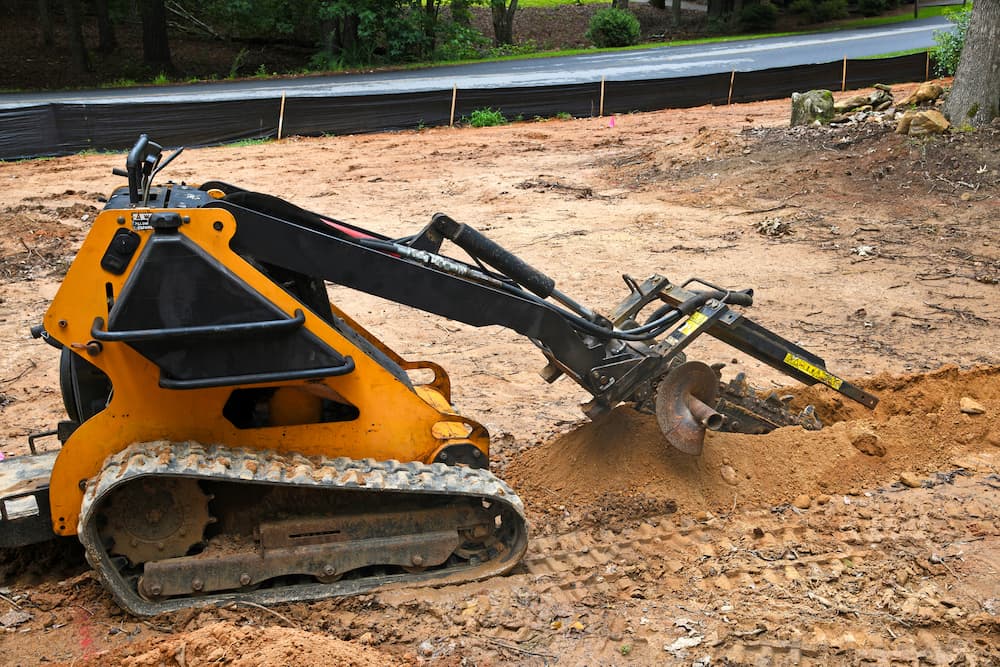 Worth the rent—a trencher can help make short work of digging your French drain trench.
Whether you’re using a mini-excavator, trencher, or just shovels, you may begin digging a deep enough trench to contain your French drain components:
- 4-inch perforated pipe
- Surrounding gravel
- Non-woven landscaping fabric trench lining
- Enough depth to accommodate the necessary gradual slope/fall as you go
- Non-perforated buried outlet pipes
As you use a mini excavator, trencher, or shovels to dig your trench, keep your tape measure handy to measure the depth of the trench as you dig—preferably every foot to every 3 feet. Remember to add adequate depth from section to section as calculated by measuring the differences in elevation and accounting for slope earlier.
You may get carried away with slope and begin with a steep slope off the bat. Adding too much slope too early can make it hard to keep the gradual amount of fall going further toward daylight without ending with a ridiculously deep trench. Making sure your trench has adequate-yet-gradual slope is much easier to account for during the digging process rather than attempting to fix it after the drain is installed!


Once you have dug your trench and made sure you have the necessary slope/fall, you can begin rolling out your non-woven landscaping fabric to line the trench. This fabric is useful for keeping dirt and roots from clogging the spaces between the gravel and preventing root infiltration of the pipe—as roots like to follow water sources. The fabric should rest against the trench floor, be brought up the trench walls, and be capable of closing itself with all of the French drain components like a big burrito—if you prefer a covered French drain. Speaking of which…
Some will have no problem leaving the components of their French drain fully exposed in what ends up looking like a gravel path through your yard. Others would prefer to completely hide it with sod. Either is a feasible option with advantages and drawbacks.
- Open-topped French grains with exposed gravel will definitely absorb more water than sod-covered systems. However, you will you be left with what looks like a gravel pathway through your yard with gravel to keep in place over the years. You will also need to be diligent about keeping weeds and roots from infiltrating your system from above. Still, this is totally manageable.
- French drains covered in sod are a great means of avoiding a gravel-pit eyesore. Still, sod-covered French drains may not catch as much water as an open-top French drain—or at the very least, will require more time for any water to seep through the sod, the fabric, and the gravel before it reaches the drain.
If you’re going to opt for a covered French drain, you may want to consider carefully cutting the sod away from the top of where the trench would be and save it in sheets to the side. Also, lining the edges of a section of the trench you want to dig with sheets of plywood can give you a nice place to rest dirt before it is hauled away without piling it on the existing grass. This can make site clean-up easier later.
Ok, so your trenches are dug and measured. What now?
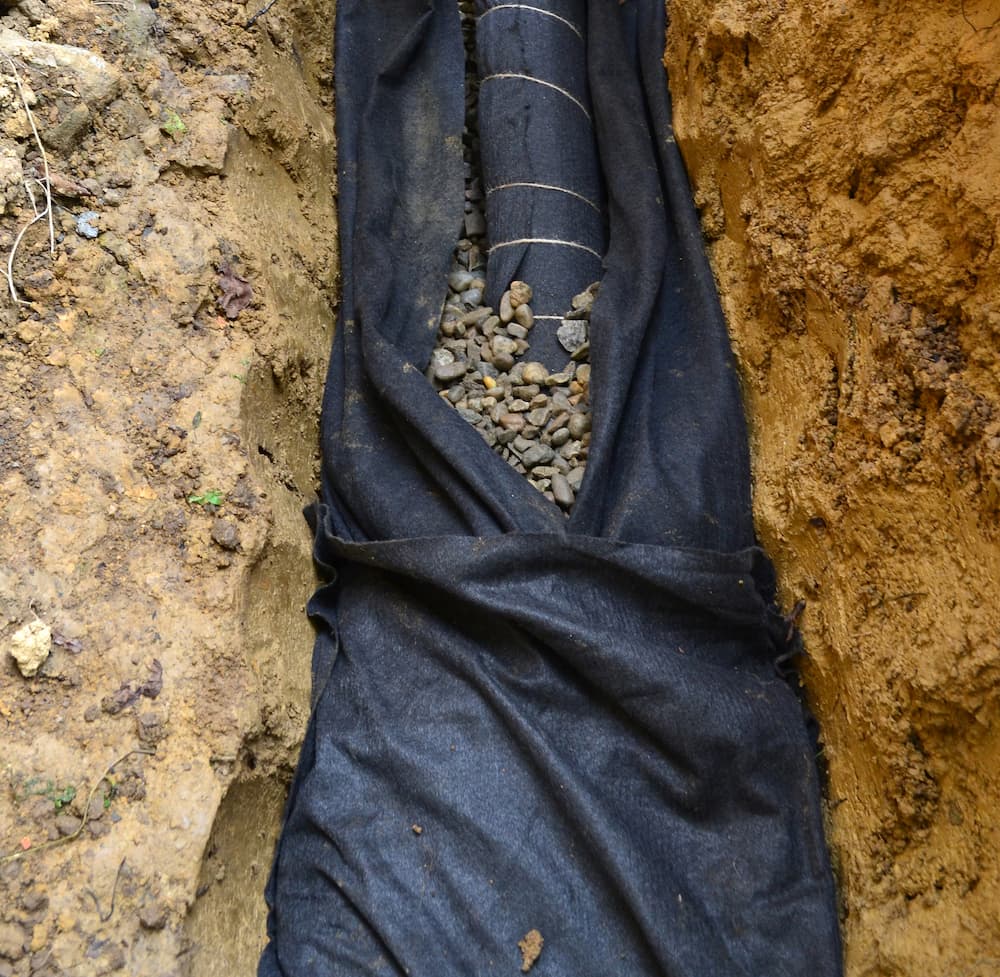
A closed French drain system being installed—aka, a French drain burrito! This homeowner opted to also wrap the pipe in fabric with twine—and option for maximum clog-prevention.
- Line the trench with your non-woven landscaping fabric
- If you’re planning on leaving the French drain open on top (no sod coverage), use your pins/stakes/staples (your preference) to secure the fabric just above the lip of the trench
- If you’re planning on covering your entire system with sod, leave enough excess fabric on the top/sides of the trench to wrap back over the contents of the French drain just below grade (ground level) — keeping it out of the way for now with sheets of plywood, bags of gravel, or anything else heavy
- Make sure the fabric is flush against the floor and walls of the trench after laying it (no “hammocking”)
- Lay a very shallow layer of gravel along the floor of the fabric-lined trench—just enough to cover the flush fabric floor of the trench to provide a buffer between the fabric and the pipe (see picture below this list)
- Remember to cap off the end of the first section of drain pipe (some prefer to start their French drain with a one-sided catch basin at-or-just-below grade—totally up to you, but additional digging may be necessary)
- Place the perforated pipe in the bottom of the trench with the perforations (holes) on the bottom side (we’ll explain later)
- As you lay the sections of the drain in the trench, make sure there are no rising or level sections of pipe—instead, maintain AT LEAST a 1% downward slope the entire length of the system
- Make necessary cuts in concrete curbs for the outlet pipe for street gutter access
- Once all of the pipe is in the trench, use your wheel loader, wheelbarrow, or shovels to bury the pipe in gravel—either slightly below grade (ground level) if you’ll be applying sod or all the way up to grade if you will be leaving the French drain system open (see image of pouring below)
- Bury the non-gravel outlet sections of solid pipe in earth—slightly below grade if you’re reapplying removed sod, or to grade if you have no sod to replace
- If you’re planning to cover the system with sod, take the excess fabric and wrap it around the gravel, pinning it with the staples like a large gravel-and-pipe filled burrito
- If you’re covering it in sod, reposition the sod where it was
- If you’re leaving your French drain gravel uncovered, make sure any stakes, pins, or staples are thoroughly driven into the ground to avoid tripping or contact with lawnmowers or other landscaping equipment
- Mix up concrete to repair sections of cut out curb over the pipe that runs to daylight
- Remove excavated earth and clean up the site
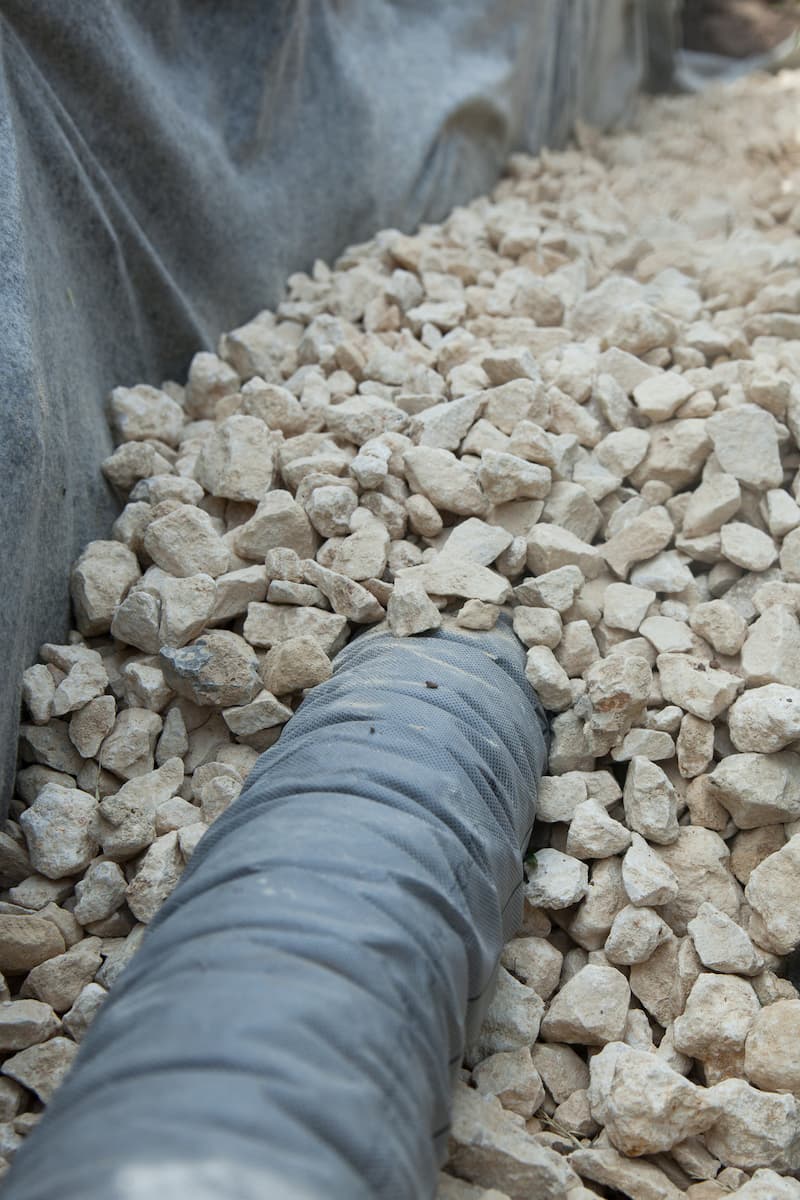
 Pictured: Step #5 — providing a layer of gravel along the floor of the lined trench.
 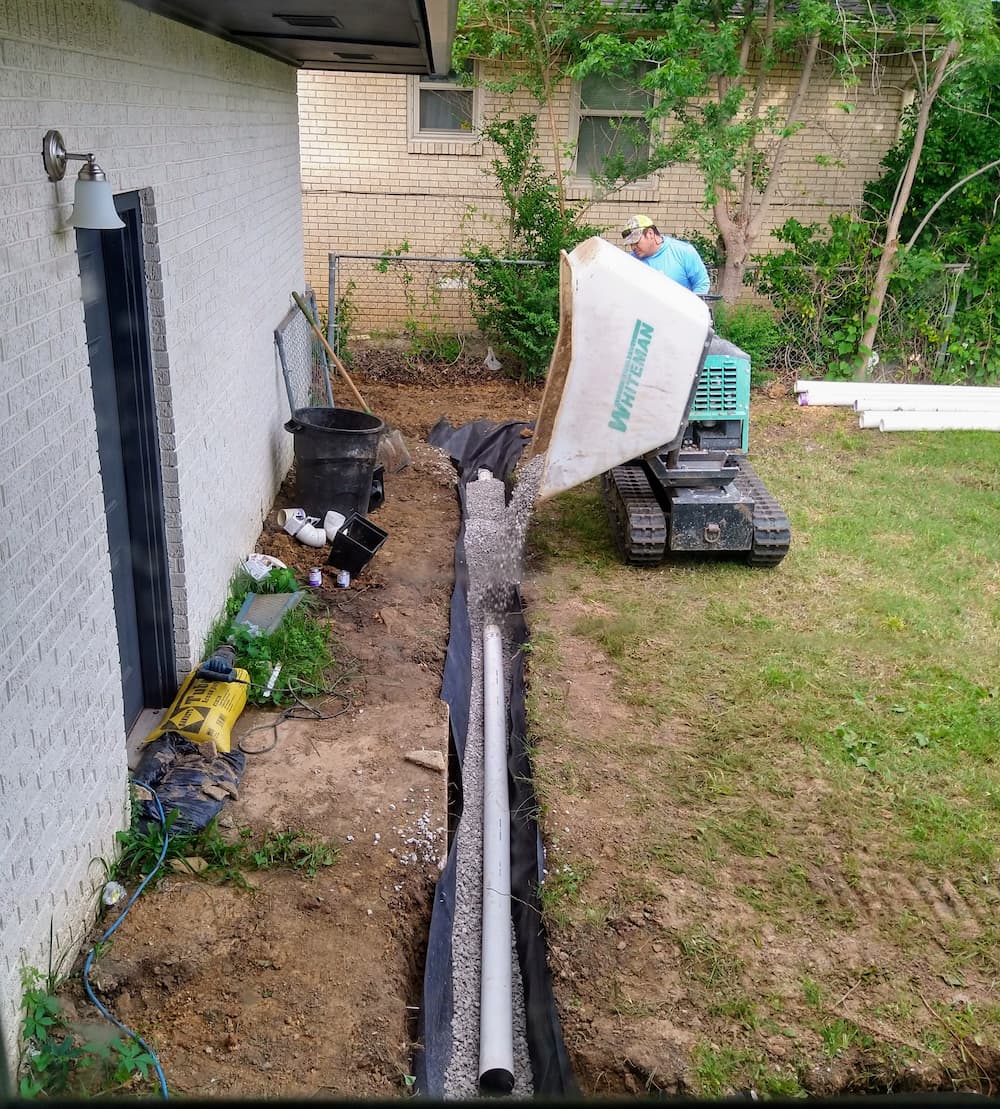 Pictured: Step #10, burying the perforated sections of pipe in earth. This worker is burying this section to stabilize it. Later, the ends will be connected to the corners.
And that’s it! Once the repaired concrete on any curb cutouts dries, you should be ready for your next stress-free, high-and-dry downpour.
Yes, a shallow layer of gravel between the fabric-lined floor of the trench and the pipe creates a nice buffer for water to flow through to access the holes in the pipe underbelly. This also distributes the weight of the pipe (and the gravel above it) better so that the holes in the pipe do not become clogged if the fabric fails.
There are some who say that you can lay a perforated French drainpipe directly on the fabric before covering it gravel. Most of those saying this are the same ones selling the fabric and stress just how strong their fabric is to allow for such an arrangement. Not all fabric is created alike, however, so a slight shallow buffer is not a bad idea.
Yes! A French drain is a “drain” after all and not just a water retention area itself. All French drain systems need to be able to drain the water to “daylight”—or an external source such as a gutter-fed storm drain or nearby creek. Failure to install a properly sloping French drain system or one without a proper daylight outlet will result in a faulty drain system and excessive rainwater pooling. So, unless you want mosquitos in the summer, make sure your French drain drains.
It is recommended that a ½ - ¾ inch washed gravel (preferably river gravel or granite) is used for French drain construction. Pea gravel is simply not large enough to create the voids and spaces between the rock for the water to flow to the pipe. Pea gravel or pea stone also contains a lot of dirt and sand that may also contribute to the clogging of your French drain system. The gravel you use should be washed, screened, and free of any dust, debris, dirt, or anything other than just rock!
It does seem like it would make more sense to install French drain pipes “holes up” to catch the water as it comes down and to keep it from leaving again. However, because water always finds its lowest position that it can permeate, this would cause the water to have to fill the gravel trench completely to the top of the pipe before it could access the drain and be whisked away. The issue here is you then have a water-filled trench and an air-filled pipe! Such installations have actually caused some French drain systems to float their way out of the trench—like a resurfacing submarine or a zombie rising from a grave!
Also, the fear of the redistribution (leaking) of captured water along the length of the pipe is remedied by the slope of the pipe and incoming water. Water can’t exit the pipe because (a) water is entering the same holes and (b) the gravitation pull created by the slope instead carries the water down the pipe faster than it could exit the pipe. Essentially, the water has two choices— “do I dribble out of a little hole that has water pushing its way in or do I take a water slide to the bottom of this pipe?” I mean, the water slide sounds way easier to us, right?
It’s a good idea to keep your French drain at least 3 feet away from houses and other structures you would like to protect from moisture—such as patios, porches, or decks. This gives your home a buffer between water and the drain system as well as gives your French drain more of a fighting chance of absorbing all excess water before it seeps into your crawlspace.
Unlike a French drain that absorbs underground and surface water, a trench drain only absorbs groundwater from the surface through a grate that leads into a concrete or metal trench. Trench drains are best suited for paved surfaces whereas French drains are suited for landscaped areas. The equivalent of a trench drain in a landscaped area may be a catch basin, which captures water through a grate-covered box-like container that feeds into sloped buried drainpipes.
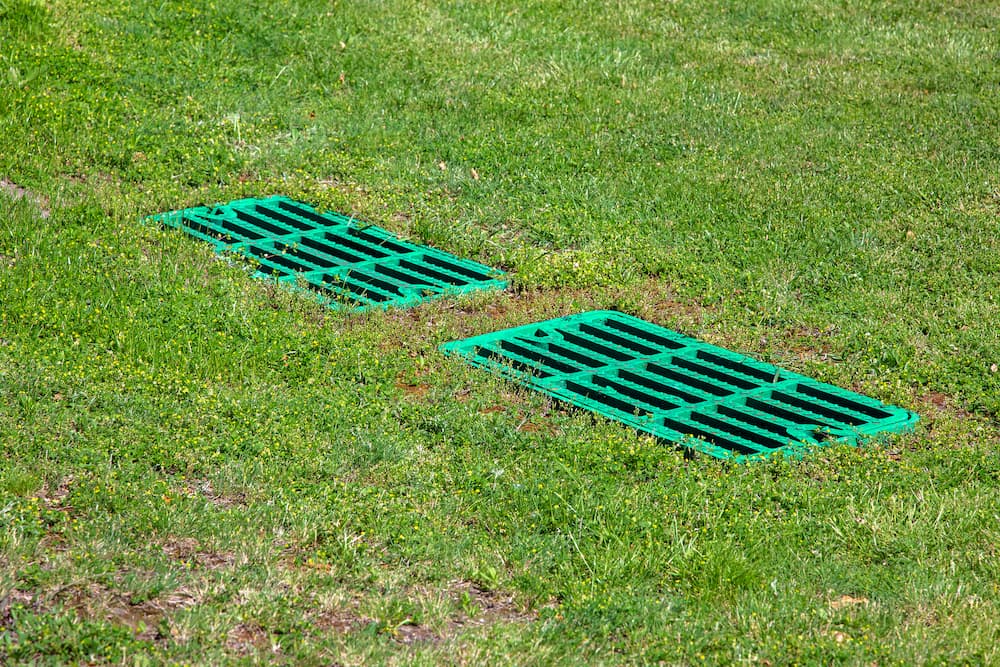 An installed catch basin. This connects to a buried pipe with a slope that carries water to daylight.
French drains can fail for a few different reasons:
- Not Enough Slope! The water captured by a French drain without enough slope may fail to reach daylight and simply pool.
- They Get Clogged! A French drain with the wrong-sized gravel, inadequate landscaping material, or that is simply degraded by age can become clogged with dirt and debris and fail to let captured water flow to daylight.
- Skinny Pipe! The diameter of a French drain may not be large enough to accommodate the amount of rainwater a particular area receives.
- Downspout Heachaches! A French drain can become clogged with roof shingle gravel if a downspout is directly tied into the same system. It’s recommended that a separate drainage pipe for downspouts is installed or that it runs into an accessible catch basin.
A French drain that is dug beyond 2 feet may interfere with deep-buried utility lines—such as gas, water, or sewage lines. Such a deep French drain also may not be as effective at rerouting surface-level water. Congrats, you just buried a pipe that water will never reach.
According to this awesome French drain gravel calculator at builderscalculator.com, a 50-foot French drain made with a 4-inch pipe, 10 inches wide and 13 inches deep (average of 8 inches and 18 inches), you will need 29.88 cubic feet or 1.55 tons of gravel. So, a heck-of-a-lot of gravel!
I mean, you could…but you definitely shouldn’t.
It is not recommended to simply bury your French drain with dirt. The dirt will become mud that will act as a barrier between the water and your French drain. If you do not plan to cover your French drain with sod, it is recommended that you leave open gravel.
Nope. They were just invented by some fella by the last name of “French” from the exotic land of…Concord, Massachusetts? Hmm…neat. Thanks, Hank!
Yes, you absolutely can install a French drain without any heavy equipment. However, should you? This depends on how much you value (A) your time and (B) your back.
- Your Time. Though installing a French drain isn’t a very complex process, without the right tools, it can be a very time-intensive job. You’re digging potentially over 100 feet of trench, moving likely over a ton of gravel, and removing over 45 cubic feet of earth (and, like, to where?). Using non-powered hand tools, this process could potentially take a few weeks to complete. Hopefully, it doesn’t rain in that amount of time!
- Your Back. Digging a trench to bury a 4-inch pipe doesn’t seem like such a big task. However, digging enough trench to bury 50-150 feet of pipe along with over a ton of gravel and moving out all of the removed soil can be back-breaking labor. You may also be required to cut through tree roots, remove large buried stones, and unearth other obstructions that shovels, shears, and hand-saws may not be able to handle.
For this reason, if you decide against hiring a French drain installation company, please—treat yourself to renting the following equipment to make your job easier:
- Trenchers. For French drain systems in smaller yards, trenchers can be great tools for getting a narrow trench dug. They’re not hard to operate and are widely available for rent.
- Mini Excavators. For larger yards, more elaborate French drain systems, or you’d simply prefer to do less follow-up digging with a shovel, a mini excavator will be a night-and-day help to you during your French drain digging project.
- Backhoes. Depending on the part of the country in which you live, a backhoe for rent may be more available than a mini excavator. Backhoes are also convenient pieces of equipment in that you can use them for not only digging your trench but also hauling dirt and gravel where you need it on the site.
- Wheeled Skid Steer Loaders. When it comes to hauling gravel or dirt around your yard, a wheeled skid steer loader with a bucket beats any wheelbarrow—hands down. They’re not incredibly difficult to operate and due to their compact size and tight turning radius, wheeled skid steer loaders are perfect for moving materials around smaller spaces.
If you need to buy or rent heavy equipment as small as your basic trencher to mini excavators, skid steer loaders, and backhoes, your friends at My Little Salesman can connect you to heavy equipment rental dealerships near you. To get started, simply visit our Heavy Equipment Rentals page, punch in your zip code, and see what is available near you.